الإشعارات (Notifications) في Laravel
مقدمة
بالإضافة لدعم إرسال البريد الإلكتروني، يوفّر Laravel دعمًا لإرسال إشعارات بين قنوات توصيل عديدة من ضمنها البريد الإكتروني، والرسائل القصيرة (عبر Nexmo)، و Slack. يمكن أيضًا حفظ الإشعارات في قاعدة البيانات لإظهارها في واجهة الويب.
تكون الإشعارات في العادة على شكل رسائل قصيرة، وغنية بالمعلومات، تنبّه المستخدم لشيءٍ حدث في التطبيق. مثلًا، إن كنت تكتب تطبيق فواتير، يمكنك إرسال تنبيه "تمّ خلاص الفاتورة" للمستخدم عبر بريد إلكتروني أو رسالة قصيرة.
إنشاء الإشعارات
في Laravel، يُمثَّل كل تنبيه بصنف (موجودٌ عادةً في المجلد app/Notifications). لا تقلق إذا لم تجد المجلد، إذ سيُنشَأ عند تنفيذ الأمر make:notification:
Php artisan make:notification InvoicePaid
سيُنشِئ هذا الأمر صنفًا جديدًا في المجلد app/Notifications. يحتوي كل صنف إشعارات على التابع via وعدد من التوابع لكتابة نص التنبيه (مثل toMail أو toDatabase) التي تحوّل التنبيه لرسالة ملائمة للقناة التي ستُرسَل عليها.
إرسال الإشعارات
استعمال الخاصية Notifiable
يمكن إرسال الإشعارات بطريقتين: باستعمال التبع notify من صنف الخاصية Notifiable أو باستعمال الواجهة الثابتة Notification. لنبدأ أولًا باستعمال الخاصية:
<?php

namespace App;

use Illuminate\Notifications\Notifiable; use Illuminate\Foundation\Auth\User as Authenticatable;

class User extends Authenticatable {

   use Notifiable;
}
تُستعمل هذه الخاصية تلقائيا في النموذج App/User وتحتوي تابعًا واحدًا يُستعمل لإرسال الإشعارات وهو notify. يتلقى هذا التابع نسخة من كائن التنبيه:
use App\Notifications\InvoicePaid;

$user->notify(new InvoicePaid($invoice));
ملاحظة: يمكن استعمال الخاصية illuminiate\Notifications\Notifiable في أي نموذج. لستَ محدودًا باستعماله في النموذج User.
استعمال الواجهة الساكنة Notification
بدلًا من ذلك، يمكن إرسال الإشعارات عبر الواجهة الساكنة Notification. يكون هذا مفيدًا خاصة عندما تريد إرسال تنبيه لعدة عناصر قابلة لتلقي إشعارات (notifiable) مثل مجموعة مستخدمين. لاستخدام لواجهة الثابتة لإرسال الإشعارات، مرّر جميع العناصر القابلة لتلقّي إشعارات مع نسخة لكائن التنبيه إلى التابع send:
Notification::send($users, new InvoicePaid($invoice));
تحديد قنوات التوصيل
يحتوي كل صنف إشعارات على التابع via الذي يحدد أي قناة ستُستخدم لإرسال التنبيه. من البداية، يمكن إرسال التنبيه على القنوات mail و database و broadcast و nexmo و slack.
ملاحظة: إذا أردت استخدام قنوات أخرى مثل Telegram أو Pusher، ابحث في موقع قنوات الإشعارات المدعوم من المجموعة.
يتلقّى التابع via نسخة الكائن notifiable$، وهو نسخة من الصنف الذي سيتلقّى الإشعارات. يمكن استعمال notifiable$ لتحديد القناة الإرسال:
/**

* الحصول على قنوات الإرسال.
*
* @param  mixed  $notifiable
* @return array
*/
public function via($notifiable) {

   return $notifiable->prefers_sms ? ['nexmo'] : ['mail', 'database'];
}
إضافة إشعارات لطابور الانتظار
تنبيه: قبل استخدام قوائم الانتظار، يجب ضبطها وإطلاق عامل في قائمة الإنتظار.
قد يستغرق إرسال إشعارات بعض الوقت، خاصة إذا احتاجت قناة الإرسال إلى واجهة API خارجية. لتسريع وقت إجابة التطبيق، أعط إشعاراتك إمكانية الإضافة لقائمة انتظار بإضافة الواجهة الثابتة ShouldQueue أو خاصية الصنف Queueable لصنف التنبيه. تُحمّل الخاصية والواجهة تلقائيًا في الأصناف المُنشَأة بالأمر make:notification لذا يمكنك استعمالها مباشرة في الصنف:
<?php

namespace App\Notifications;

use Illuminate\Bus\Queueable; use Illuminate\Notifications\Notification; use Illuminate\Contracts\Queue\ShouldQueue;

class InvoicePaid extends Notification implements ShouldQueue {

   use Queueable;
  // ...
}
حالما تضاف الواجهة ShouldQueue لصنف التنبيه، يمكنك إرسال الإشعارات كالمعتاد. سيكتشف Laravel الواجهة ويضيف تلقائيًا إرسال الإشعارات إلى قائمة انتظار:
$user->notify(new InvoicePaid($invoice));
إذا أردت تأخير إيصال التنبيه، يمكنك إضافة التابع delay حين صناعة التنبيه:
$when = now()->addMinutes(10);

$user->notify((new InvoicePaid($invoice))->delay($when));
إشعارات حسب الطلب
قد تحتاج في بعض الأحيان لإرسال تنبيه لشخص ليس مسّجلًا كمستخدم. باستخدام التابع Notifications::route، يمكنك تحديد توجيه تنبيه مخصّص قبل إرسال التوجيه:
Notification::route('mail', 'taylor@example.com')

           ->route('nexmo', '5555555555')
           ->notify(new InvoicePaid($invoice));
إشعارات البريد الإلكتروني
تنسيق رسائل البريد
إذا كان التنبيه يدعم الإرسال بالبريد، يجب تعريف التابع toMail في صنف التنبيه. يقبل هذا التابع كائن notifiable$ ويعيد نسخة الكائن Illuminate\Notifications\Messages\MailMessage. يمكن أن تحتوي رسائل سطورًا من النصوص بالإضافة مِحث لاتخاذ إجراء. لنلقِ نظرةً على مثال تابع toMail:
/**

*الحصول على تمثيل للتنبيه.
*
* @param  mixed  $notifiable
* @return \Illuminate\Notifications\Messages\MailMessage
*/
public function toMail($notifiable) {

   $url = url('/invoice/'.$this->invoice->id);
   return (new MailMessage)
               ->greeting('Hello!')
               ->line('One of your invoices has been paid!')
               ->action('View Invoice', $url)
               ->line('Thank you for using our application!');
}
ملاحظة: لاحظ أنّنا استعملنا this->invoice->id$ في التابع toMail. يمكنك تمرير أي بيانات تحتاجها لتوليد الرسالة في التابع الباني للتنبيه.
في هذا المثال، سجّلنا تحيةً، ثم سطرًا من النص، ثم محثًا لاتخاذ إجراءٍ ما، ثمّ سطرًا آخر من النص. هذه التوابع التي يوفّرها الكائن MailMessage تجعل تنسيق بريدٍ قصيرٍ أمرًا سريعًا وبسيطًا. بعد ذلك، ستُحوّل قناة البريد المكوّنات لقالب HTML جميل ومتجاوب يحتوي على نص بسيط. في ما يلي مثال على بريد مولّد بالقناة mail:

ملاحظة: عند بعث إشعارات بالبريد الإلكتروني، تأكد من ضبط قيمة name في ملف الضبط config/app.php. ستُستعمل هذه القيمة في رأس وتذييل الرسالة.
خيارات تنسيق إضافية
بدل تعريف الأسطر في صنف التنبيه، يمكن استعمال التابع view لتحديد قالب خاص يُستعمَل لإظهار بريد التنبيه:
/**

*الحصول على تمثيل للتنبيه.
*
* @param  mixed  $notifiable
* @return \Illuminate\Notifications\Messages\MailMessage
*/
public function toMail($notifiable) {

   return (new MailMessage)->view(
       'emails.name', ['invoice' => $this->invoice]
   );
يمكن أيضًا إعادة كائن قابل للإرسال من التابع toMail:
/**

* الحصول على تمثيل للتنبيه.
*
* @param  mixed  $notifiable
* @return Mailable
*/
public function toMail($notifiable) {

   return (new Mailable($this->invoice))->to($this->user->email);
} .

*
* @param  mixed  $notifiable
* @return Mailable
*/
public function toMail($notifiable) {

   return (new Mailable($this->invoice))->to($this->user->email);
}
رسائل الأخطاء
بعض الإشعارات تُعلم المستخدم بوقوع خطأ. مثل خطأ في دفع فاتورة. يمكنك ذكر أن رسالة التنبيه بخصوص خطأ باستعمال التابع error عند صنع الرسالة. عند استعمال التابع error على رسالة، يكون زرّ نداء العمل أحمرَ اللون بدل الأزرق:
/**

* الحصول على تمثيل للتنبيه.
*
* @param  mixed  $notifiable
* @return \Illuminate\Notifications\Message
*/
public function toMail($notifiable) {

   return (new MailMessage)
               ->error()
               ->subject('Notification Subject')
               ->line('...');
}
تخصيص المتلقي
عند إرسال التنبيه عبر القناة mail، سيبحث نظام الإشعارات تلقائيًا عن خاصية email في الكائن القابل لتلقي تنبيه. يمكنك تخصيص أي عنوان إلكتروني يُستعمَل لإرسال الإشعارات بتعريف التابع routeNotifcationForMail:
<?php

namespace App;

use Illuminate\Notifications\Notifiable; use Illuminate\Foundation\Auth\User as Authenticatable;

class User extends Authenticatable {

   use Notifiable;
   /**
    * توجيه الرسالة للقناة.
    *
    * @param  \Illuminate\Notifications\Notification  $notification
    * @return string
    */
   public function routeNotificationForMail($notification)
   {
       return $this->email_address;
   }
}
تخصيص الموضوع
في العادة، يكون موضوع الرسالة هو اسم صنف التنبيه منسّق بطريقة "كتابة العنوان". لذا إذا كان اسم صنف الإشعارات InvoicePaid، فسيكون الموضوع Invoice Paid. إذا أردت تحديد موضوع معيّن للرسالة، فاستعمل التابع subject عند بناء الرسالة:
/**

*الحصول على تمثيل للتنبيه.
*
* @param  mixed  $notifiable
* @return \Illuminate\Notifications\Messages\MailMessage
*/
public function toMail($notifiable) {

   return (new MailMessage)
               ->subject('Notification Subject')
               ->line('...');
}
تخصيص القالب
يمكن تغيير قالب HTML وقالب النص البسيط المستخدَم من قِبل الرسالة بنشر مصدر حزمة التنبيه.
php artisan vendor:publish --tag=laravel-notifications
إشعارات بريد Markdown
تسمح إشعارات Markdown بالإستفادة من القوالب المصنوعة مسبقًا في البريد الإلكتروني في حين توفّر في نفس الوقت حريّة كتابة أطول وأكثر تخصيصًا حيث تُكتب بلغة Markdown. يُظهر Laravel قوالب HTML بطريقة جميلة ومتجاوبة للرسائل في حين يولّد تلقائيًا نسخة مقابلة من النص البسيط.
توليد الرسالة
لتوليد تنبيه بقالب Markdown معيّن، استعمل الخيار markdown-- مع الأمر make:notification:
php artisan make:notification InvoicePaid --markdown=mail.invoice.paid
كبقية إشعارات البريد، يجب على الإشعارات التي تستعمل Markdown أن تُعرِّف التابع toMail في صنف الإشعارات. لكن بدل استعمال line و action، استعمل التابع markdown لتحديد اسم القالب الذي يجب استعماله:
/**

*
* @param  mixed  $notifiable
* @return \Illuminate\Notifications\Messages\MailMessage
*/
public function toMail($notifiable) {

   $url = url('/invoice/'.$this->invoice->id);
   return (new MailMessage)
               ->subject('Invoice Paid')
               ->markdown('mail.invoice.paid', ['url' => $url]);
}
كتابة الرسالة
تستعمل إشعارات Markdown مزيجًا من مكونات Blade و نصوص Markdown مما يسمح ببناء الإشعارات بسهولة إلى جانب استعمال مكونات Laravel المصنوعة مسبقًا:
@component('mail::message')
# Invoice Paid

Your invoice has been paid!

@component('mail::button', ['url' => $url])
View Invoice
@endcomponent

Thanks,<br>
{{ config('app.name') }}
@endcomponent
المكوّن Button
يُظهر المكوّن button زًرَّ ربط في وسط الصفحة. يقبل المكوّن معاملَين: مسار url ولونًا اختياريًا color. الألوان المدعومة هي blue و green و red. يمكنك إضافة أي عدد تريده من الأزرار:
@component('mail::button', ['url' => $url, 'color' => 'green']) View Order @endcomponent
المكوّن Panel
يُظهرالمكوّن Panel النص المُمرّر كمجموعة بخلفية مختلفة قليلًا عن بقية الرسالة مما يسمح بجذب الانتباه لهذا النص:
@component('mail::panel') This is the panel content. @endcomponent
المكوّن Table
يسمح المكوّن table بتحويل جدول Markdown لجدول HTML. يقبل المكوّن جدول Markdown كمحتوى ويدعم المحاذاة باستخدام نص محاذاة Markdown:
@component('mail::table')
| Laravel        | Table              | Example      |
| ---------------|:-----------------: | ------------:|
| Col 2 is       | Centered           | $10          |
| Col 3 is       | Right-Aligned      | $20          |
@endcomponent
تخصيص المكونات
يمكنك تحميل كل المكونات من Markdown في التطبيق لتخصيصها. لتحويل المكونات، استعمل الأمر vendor:publish لنشر الأصول laravel-mail:
php artisan vendor:publish --tag=laravel-mail
سيُحمّل هذا الأمر مكونات Markdown في المجلد resources/views/vendor/mail. سيحتوي المجلد mail على مجلد html ومجلد markdown، كل منهما يحتوي على النسخة الملائمة من المكوّنات. تُستخدم المكونات في المجلد html لبناء نسخة html من الرسالة في حين تُستخدم المكونات من المجلد Markdown لبناء نسخة نص عادي. لك حرية تخصيص هذه المكونات كما تريد.
تخصيص ال CSS
بعد تحميل المكونات، يحتوي المجلد resources/views/vendor/mail/html/themes على ملف css المبدئي default.css. يمكنك تخصيص تخطيط CSS في هذا الملف وسيُضمّن تلقائيًا في العرض HTML لرسائل Markdown. ملاحظة: إذا أردت بناء نمط جديد لمكون Markdown، اكتب ملف CSS جديد في المجلد html/themes وغيّر الخيار theme في ملف الضبط mail.
إشعارات قاعدة البيانات
المتطلبات
تُخزّن قناة الإشعارات database معلومات الإشعارات في جدول في قاعدة البيانات. يحتوي هذا الجدول على معلومات مثل نوع التنبيه ومعلومات JSON خاصّة لوصف التنبيه.
يمكن مساءلة الجدول لعرض الإشعارات في واجهة المستخدم لكن قبل أن تتمكن من القيام بذلك، ستحتاج لإنشاء جدول قاعدة بيانات لحمل الإشعارات. يمكن استعمال notifications:table لتوليد ترحيل بالمخطط المناسب:
php artisan notifications:table
php artisan migrate
تنسيق إشعارات قواعد البيانات
إذا كان التنبيه يدعم التخزين في قاعدة البيانات، يجب تعريف أحد التابعين toDatabase أو toArray في صنف التنبيه. سيتلقى هذا التابع كائن notifiable$ يُعيد مصفوفة PHP. تُشفّر المصفوفة المُرجعة كشيفرة JSON وتُخزَّن في الخانة data من الجدول notifications. فلنلق نظرة على التابع toArray:
/**

* Get the array representation of the notification.
*
* @param  mixed  $notifiable
* @return array
*/
public function toArray($notifiable) {

   return [
       'invoice_id' => $this->invoice->id,
       'amount' => $this->invoice->amount,
   ];
}
المقارنة بين toDatabase و toArray
يُستعمل التابع toArray أيضًا من خدمة البث (broadcast) للتثبت من أي بيانات يجب بثها لعميل JavaScript. إذا أردت استخدام مصفوفتين مختلفتين لتمثيل القناتين roadcast و database، فيجب عليك تعريف التابع toDatabase و toArray.
الوصول للإشعارات
بعد تسجيل التنبيه في قاعدة البيانات، ستحتاج إلى طريقةٍ سهلةٍ للوصول إليها من الكائنات القابلة للتنبيه في التطبيق. الخاصية Illuminate\Notifications\Notifiable المضمّنة أصلًا في النموذج App\User تحمل علاقة Eloquent هي notifications التي تُعيد التنبيه للكائن. لإعادة الإشعارات، استخدم التابع كأي علاقة Eloquent. ستُصنَّف الإشعارات تلقائيًا حسب وقت الصنع created_at:
$user = App\User::find(1);

foreach ($user->notifications as $notification) {

   echo $notification->type;
}
إذا أردت إعادة الإشعارات غير المقروءة فقط، استعمل العلاقة unreadNotifications. ستُرتَّب الإشعارات هنا أيضًا حسب وقت الصنع created_at:
$user = App\User::find(1);

foreach ($user->unreadNotifications as $notification) {

   echo $notification->type;
}
ملاحظة: للوصول إلى الإشعارات من عميل JavaScript، فيجب تعريف وحدة تحكم للتطبيق حيث تُعيد الإشعارات للكائنات القابلة للتنبيه ككائن المستخدم الحالي. ثم يمكنك إطلاق طلب HTTP لوحدة التحكم تلك من عميل JavaScript.
وضع إشارة مقروء على الإشعارات
في العادة، ستريد وضع علامة مقروء على التنبيه بعد أن يراه المستخدم. توفّر الخاصية Illuminate\Notifications\Notifiable التابع markAsRead الذي يحيّن الخانة read_at في قاعدة البيانات:
$user = App\User::find(1);

foreach ($user->unreadNotifications as $notification) {

   $notification->markAsRead();
}
لكن بدل تكرار العمل على كل الإشعارات، يمكن استعمال التابع markAsRead مباشرة على مجموعة إشعارات:
$user->unreadNotifications->markAsRead();
يمكن أيضًا طلب تحيين جماعي لوضع الإشعارات كمقروءة دون الحاجة للحصول عليها من قاعدة البيانات:
$user = App\User::find(1);

$user->unreadNotifications()->update(['read_at' => now()]);
طبعًا، يمكن استعمال التابع delete لحذف التنبيه نهائيًا من قاعدة البيانات:
$user->notifications()->delete();
إشعارات البث
المتطلبات
قبل بث الإشعارات، يجب ضبط البث التعوّد على العمل بخدمات البث. يوفّر بث الأحداث طريقة للتفاعل مع أحداث Laravel المُطلق من جهة الخادم من عميل JavaScript.
تنسيق بث الإشعارات
تبث القناة broadcast الإشعارات باستعمال خدمة بث الأحداث في Laravel، مما يسمح لعميل JavaScript بالحصول على الإشعارات في وقتها الحقيقي. إذا كانت الإشعارات تدعم البث، يجب تعريف التابع toBroadcast في صنف التنبيه. يتلقى هذا التابع كائن notfifiable$ ويعيد نسخة الكائن BroadcastMessage، ترمَّز البيانات المعادة كشيفرة JSON وتُبثّ لعميل JavaScript. لنلق نظرة على مثال عن التابع toBroadcast:
use Illuminate\Notifications\Messages\BroadcastMessage;

/**

* الحصول على البث.
*
* @param  mixed  $notifiable
* @return BroadcastMessage
*/
public function toBroadcast($notifiable) {

   return new BroadcastMessage([
       'invoice_id' => $this->invoice->id,
       'amount' => $this->invoice->amount,
   ]);
}
ضبط طابور انتظار البث
توجد كل الإشعارات المعدة للبث في طابور انتظار البث. إذا أردت ضبط اسم أو وصلة الطابور المستخدم مع بث الإشعارات، استخدم التابعين onConnection و onQueue من
BroadcastMessage: return (new BroadcastMessage($data))

               ->onConnection('sqs')
               ->onQueue('broadcasts');
ملاحظة: بالإضافة للبيانات التي تُحدّدها، يحتوي بث الإشعارات أيضًا على خانة type تحتوي اسم صنف التنبيه.
الاستماع للإشعارات
تُبث الإشعارات على قناة خاصة منسقة بطريقة {notifiable}.{id}. لذا، إذا أرسلتَ تنبيهًا للنموذج App\User مع ID يساوي 1، سيُبث التنبيه على القناة الخاصة App.User.1. عند استعمال Laravel echo يمكنك الاستماع بسهولة لأي قناة باستعمال التابع المساعد notification:
Echo.private('App.User.' + userId)

   .notification((notification) => {
       console.log(notification.type);
   });
تخصيص قنوات الإشعار
إذا أردت اختيار القناة التي تتلقى عليها بث الإشعارات، يمكنك تعريف التابع receivesBroadcastNotificationsOn للكائن المتلقي للإشعارات:
<?php

namespace App;

use Illuminate\Notifications\Notifiable; use Illuminate\Broadcasting\PrivateChannel; use Illuminate\Foundation\Auth\User as Authenticatable;

class User extends Authenticatable {

   use Notifiable;
   /**
    * The channels the user receives notification broadcasts on.
    *
    * @return string
    */
   public function receivesBroadcastNotificationsOn()
   {
       return 'users.'.$this->id;
   }
}
إشعارات الرسائل القصيرة SMS
المتطلبات
خدمة إرسال إشعارات SMS مدعومة من قبل Nexmo. قبل أن تتمكن من إرسال الإشعارات، يجب أن تُثبت الحزمة nexmo/client وأن تضيف خيارات الضبط لملف الضبط config/services.php. يمكنك نسخ مثال الضبط التالي للبدء:
'nexmo' => [

   'key' => env('NEXMO_KEY'),
   'secret' => env('NEXMO_SECRET'),
   'sms_from' => '15556666666',
],
الخيار sms_from هو رقم الهاتف الذي ستُرسل منه رسالة التنبيه. يجب عليك إنشاء رقم هاتف لتطبيقك من لوحة تحكم Nexmo.
تنسيق إشعارات SMS
إذا كان التنبيه يدعم الإرسال عبر رسالة SMS، يجب تعريف التابع toNexmo في صنف التنبيه. سيتلقى التابع كائن notifiable$ ويعيد نسخة الكائن Illuminate\Notifications\Messages\NexmoMessage:
/**

* Get the Nexmo / SMS representation of the notification.
*
* @param  mixed  $notifiable
* @return NexmoMessage
*/
public function toNexmo($notifiable) {

   return (new NexmoMessage)
               ->content('Your SMS message content');
}
محتوى Unicode
إذا الرسالة تحتوي رموز unicode، فيجب استدعاء التابع unicode عند بناء الرسالة NexmoMessage:
/**

* Get the Nexmo / SMS representation of the notification.
*
* @param  mixed  $notifiable
* @return NexmoMessage
*/
public function toNexmo($notifiable) {

   return (new NexmoMessage)
               ->content('Your unicode message')
               ->unicode();
}
تخصيص الرقم "from"
إن أردت إرسال تنبيه من رقم غير الرقم المُعرَف في config/services.php، استعمل التابع from في NexmoMessage:
/**

* Get the Nexmo / SMS representation of the notification.
*
* @param  mixed  $notifiable
* @return NexmoMessage
*/
public function toNexmo($notifiable) {

   return (new NexmoMessage)
               ->content('Your SMS message content')
               ->from('15554443333');
}
توجيه إشعارات SMS
عند إرسال إشعارات عبر قناة nexmo، سيبحث نظام الإشعارات تلقائيًا عن الخاصية phone_number في الكائن المنبَه. إن أردت تخصيص رقم هاتف يُرسَل إليه التنبيه، عرِّف التابع routeNotificationForNexmo في الكائن:
<?php

namespace App;

use Illuminate\Notifications\Notifiable; use Illuminate\Foundation\Auth\User as Authenticatable;

class User extends Authenticatable {

   use Notifiable;
   /**
    * Route notifications for the Nexmo channel.
    *
    * @param  \Illuminate\Notifications\Notification  $notification
    * @return string
    */
   public function routeNotificationForNexmo($notification)
   {
       return $this->phone;
   }
}
إشعارات Slack
المتطلبات
قبل أن تتمكن من إرسال إشعارات عبر Slack، يجب عليك تثبيت المكتبة Guzzle HTTP عبر Composer:
composer require guzzlehttp/guzzle
ستحتاج أيضًا إلى ضبط "Incoming Webhook" لفريق Slack. سيُوفر هذا الضبط مسار URL يمكنك استعماله عند إرسال إشعارات Slack.
تنسيق إشعارات slack
إن كان التنبيه يدعم الإرسال عبر Slack، يجب تعريف التابع toSlack في صنف التنبيه. سيتلقى التابع كائن notifiable$ ويعيد نسخة الكائن Illuminate\Notifications\Messages\SlackMessage. يمكن أن تحتوي إشعارات Slack على نصوص بالإضافة لمرفقات تنسق نصوصًا إضافية أو مصفوفة من الخانات. لنلق نظرة على مثال toSlack أساسي:
/**

* Get the Slack representation of the notification.
*
* @param  mixed  $notifiable
* @return SlackMessage
*/
public function toSlack($notifiable) {

   return (new SlackMessage)
               ->content('One of your invoices has been paid!');
}
في هذا المثال، أرسلنا فقط سطر نص مما سينتج تنبيها كالآتي:

تخصيص المرسل و المتلقي
يمكن استعمال التابعين from و to لتخصيص مرسل ومتلق للتنبيه. يقبل التابع from اسم مستخدم أو معرف emoji بينما يقبل التابع to قناة إرسال أو اسم مستخدم:
/**

* Get the Slack representation of the notification.
*
* @param  mixed  $notifiable
* @return SlackMessage
*/
public function toSlack($notifiable) {

   return (new SlackMessage)
               ->from('Ghost', ':ghost:')
               ->to('#other')
               ->content('This will be sent to #other');
}
يمكنك أيضًا استعمال صورة بدل وجه emoji:
/**

* Get the Slack representation of the notification.
*
* @param  mixed  $notifiable
* @return SlackMessage
*/
public function toSlack($notifiable) {

   return (new SlackMessage)
               ->from('Laravel')
               ->image('https://laravel.com/favicon.png')
               ->content('This will display the Laravel logo next to the message');
}
مرفقات Slack
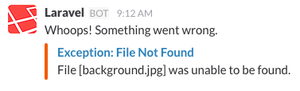
يمكنك إضافة مرفقات لإشعارات Slack، توفر المرفقات خيارات تنسيق أكثر من النص العادي. في هذا المثال، سنرسل تنبيه خطأ عن استثناء حصل في التطبيق مع رابط لعرض معلومات إضافية عن الاستثناء:
/**

* Get the Slack representation of the notification.
*
* @param  mixed  $notifiable
* @return SlackMessage
*/
public function toSlack($notifiable) {

   $url = url('/exceptions/'.$this->exception->id);
   return (new SlackMessage)
               ->error()
               ->content('Whoops! Something went wrong.')
               ->attachment(function ($attachment) use ($url) {
                   $attachment->title('Exception: File Not Found', $url)
                              ->content('File [background.jpg] was not found.');
               });
}
سيُنتج المثال السابق رسالة Slack مشابهة للآتي
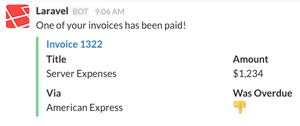
تسمح المرفقات أيضا بتحديد مصفوفة بيانات تُقدم للمستخدم. ستقدم البيانات في شكل جدول لتسهيل القراءة:
/**

* Get the Slack representation of the notification.
*
* @param  mixed  $notifiable
* @return SlackMessage
*/
public function toSlack($notifiable)

{

   $url = url('/invoices/'.$this->invoice->id);
   return (new SlackMessage)
               ->success()
               ->content('One of your invoices has been paid!')
               ->attachment(function ($attachment) use ($url) {
                   $attachment->title('Invoice 1322', $url)
                              ->fields([
                                   'Title' => 'Server Expenses',
                                   'Amount' => '$1,234',
                                   'Via' => 'American Express',
                                   'Was Overdue' => ':-1:',
                               ]);
               });
}
سينتج المثال السابق رسالة Slack تشبه ما يلي:
محتوى المرفقات Markdown
إن كانت بعض حقول المرفقات تحتوي Markdown، استعمل التابع markdown لإعلام Slack عن طريقة قراءة وعرض محتوى الحقل. القيم التي يقبلها التابع هي pretext أو text أو fields. لمزيد من المعلومات عن تنسيق مرفقات Slack راجع توثيق Slack API:
/**

* Get the Slack representation of the notification.
*
* @param  mixed  $notifiable
* @return SlackMessage
*/
public function toSlack($notifiable) {

   $url = url('/exceptions/'.$this->exception->id);
   return (new SlackMessage)
               ->error()
               ->content('Whoops! Something went wrong.')
               ->attachment(function ($attachment) use ($url) {
                   $attachment->title('Exception: File Not Found', $url)
                              ->content('File [background.jpg] was *not found*.')
                              ->markdown(['text']);
               });
}
توجيه إشعارات slack
لتوجيه إشعارات Slack لأماكنها الصحيحة، عرف التابع routeNotificationForSlack في الكائن المنَبه. سيعيد التابع مسار Webhook URL يجب أن تُرسل الإشعارات إليه. يمكن الحصول على المسار أيضًا عبر خدمة "Incoming Webhook" في فريق Slack:
<?php

namespace App;

use Illuminate\Notifications\Notifiable; use Illuminate\Foundation\Auth\User as Authenticatable;

class User extends Authenticatable {

   use Notifiable;
   /**
    * Route notifications for the Slack channel.
    *
    * @param  \Illuminate\Notifications\Notification  $notification
    * @return string
    */
   public function routeNotificationForSlack($notification)
   {
       return $this->slack_webhook_url;
   }
}
أحداث الإشعارات
عندما يُرسَل تنبيه ما، يُطلِق نظام الإشعارات الحدث Illuminate\Notifications\Events\NotificationSent. يحتوي الحدث على الكائن المنبَه ونسخة التنبيه نفسه. يمكنك تسجيل مستمعات على هذا الحدث في EventServiceProvider:
/**

* The event listener mappings for the application.
*
* @var array
*/
protected $listen = [

   'Illuminate\Notifications\Events\NotificationSent' => [
       'App\Listeners\LogNotification',
   ],ا
];
ملاحظة: بعد تسجيل المستمع في EventServiceProvider، استعمل الأمر event:generate لإنشاء أصناف المستمعات بسرعة.
في صنف المستمع، يمكنك الوصول إلى الخاصيات notifiable و notification و channel للحدث للمعرفة معلومات عن المتلقي وعن التنبيه:
/**

* Handle the event.
*
* @param  NotificationSent  $event
* @return void
*/
public function handle(NotificationSent $event) {

  // $event->channel
  // $event->notifiable
  // $event->notification
}
القنوات المخصصة
يأتي Laravel مع عدد من قنوات إرسال الإشعارات، لكن قد تريد كتابة مشغلك الخاص لإرسال الإشعارات عبر قنوات أخرى. يجعل Laravel هذا سهلا. للبدء، عرف صنفا يحتوي التابع send. يجب أن يقبل هذا التابع معاملين notifiable$ و notification$:
<?php

namespace App\Channels;

use Illuminate\Notifications\Notification;

class VoiceChannel {

   /**
    * Send the given notification.
    *
    * @param  mixed  $notifiable
    * @param  \Illuminate\Notifications\Notification  $notification
    * @return void
    */
   public function send($notifiable, Notification $notification)
   {
       $message = $notification->toVoice($notifiable);
      // Send notification to the $notifiable instance...
   }
}
بعد تعريف قناة التنبيه، يمكنك إعادة اسم الصنف من التابع via من أي تنبيه:
<?php

namespace App\Notifications;

use Illuminate\Bus\Queueable; use App\Channels\VoiceChannel; use App\Channels\Messages\VoiceMessage; use Illuminate\Notifications\Notification; use Illuminate\Contracts\Queue\ShouldQueue;

class InvoicePaid extends Notification {

   use Queueable;
   /**
    * Get the notification channels.
    *
    * @param  mixed  $notifiable
    * @return array|string
    */
   public function via($notifiable)
   {
       return [VoiceChannel::class];
   }
   /**
    * Get the voice representation of the notification.
    *
    * @param  mixed  $notifiable
    * @return VoiceMessage
    */
   public function toVoice($notifiable)
   {
      // ...
   }
}